
Create Custom Variable Rate & Amplitude Graphic Lines to use in Dorico
Working on a New Music graphical notation project, the sketch called for a graphic of vibrato illustrating variable rate and amplitude.
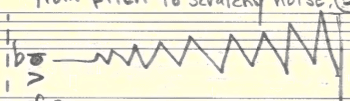
There were several possible ways to recreate this hand-drawn line. We could simply scan the original and import it as a graphic. Another option was to try to recreate it using Dorico’s glyphs in the Music Symbols or Line Editors. Dorico includes several wave-shaped glyphs of different sizes that can be assembled into more complex shapes, but none of these tools can generate a line whose rate and amplitude vary continuously. The solution is to create custom SVG graphics and import them into Dorico.
We want an engraving-quality graphic illustrating these musical parameters:
- how fast the vibrato is
- how wide it is
- how each variable changes over the course of the gesture.
So we built a tool to do it.
The generator below creates the shape and exports it as SVG.
Vibrato SVG Generator
Create a smooth vibrato line with independently graduated rate and width, then export it as SVG.
Using SVG Graphics in Dorico
Note! When working with SVG lines in Dorico as either Lines or Playing Techniques while in Dark Mode, you won’t be able to see the lines you create in the Editor preview panel, or in the Workspace asset lists. Dorico doesn’t invert SVG graphics for display in its user interface, as it does with fonts and other glyphs. Switch to light mode for this work (at least for now!).
There are 3 options within the app useful for adding SVG graphics to a notation project:
Graphics Frames in Engrave Mode
For some applications, Graphics Frames in Engrave Mode work well, with the disadvantage that their position is page-relative, rather than Flow-relative. Any change in layout can cause these elements to be displaced, and if there are a lot of them, that can cause major problems when finalizing layouts for parts and score.
Playing Techniques Editor
Using SVG graphics as Playing Techniques is possible, and works as a method to lock the graphic into a grid position in the music Flow. The layout position of Playing Techniques is rules-based in Dorico. It’s possible to change the size of a Playing Technique graphic through the Custom Scale property, and move it along the System rhythm grid, and nudge its position by fine increments in Engrave Mode. Playing techniques are center-aligned over the notehead by default, so each must be moved in Engrave mode (ctrl/alt-arrow, or shift ctrl/alt-arrow for larger moves) if they are to follow the music over a duration.
Using the Playing Techniques Editor to Add Custom Lines to a Score or Part
- Open the Playing Techniques Editor
- Click the “+” in the lower left to create a new Playing Technique
- Give it a name: “Var. Vibrato” or something else
- Leave it assigned to “Common” category (optional)
- Choose Glyph as the Type
- Leave the defaults for the next 2 options
- Give it a short name for the Popover text
- Under the Continuation tab, select None from the Continuation Type drop-down.
- Click the pencil icon under the white display area at the top to start bringing in the graphic to the Glyph editor.
- The editor opens. You’ll see text in there. Click the little garbage can under the grid box to get rid of it.
- Click the Graphics tab. Use the Choose button to bring your SVG graphic in.
Note (again…) If you’re working in Dark mode, you won’t be able to see your SVG in the display below after you add it (although, If you look really closely, you’ll see that it’s there). Alternatively, for the duration of this process, change the theme to Light Mode (Preferences>General>Window>[drop-down]) - Under the Preview, see and click Add graphic. Choose your newly downloaded custom SVG.
- Use the tools in the Component Editor screen to the left to adjust its position and scale, if needed.
- Add it to the score –
- Select a note in the score
- Open the Playing Techniques Popover (shift-P) and type in your shortcut, or
- Click it in the Playing Techniques Palette on the right side of your Dorico workspace to attach it to the mouse cursor to drop into the score.
- You can adjust its position in Engrave Mode with the usual shortcuts, and change its size in Write mode with the Custom Scale property if needed.
The Line Editor
Adding graphics as Lines in Dorico might be a more flexible option when extending a graphic over a duration. The process involves adding your SVG graphic as the “Start Cap” to a new line via the Annotation editor, and then changing the Line Body to make it invisible.
- Open the Line Editor
- Click the “+” in the lower left to create a new Line
- Give it a name: “Crazy Vibrato” or something else
- Click the Line Body Editor link.
- Create a new Line Body Type by clicking the “+” at the bottom left.
- Name the line “Invisible.”
- Select Type “Solid” with a width of 0 (zero).
- Select your Invisible line from the list and click “OK.”
- Next you’ll be bringing in your SVG to use as the Start Cap. In order to do that, you have to go to the Line Annotation Editor first by clicking its link.
- The editor opens.
- Select Music Symbol in the Category drop-down.
- Click the “+” to create a new Music Symbol.
- Give it a name – “Crazy Vibrato” can work here as well.
- Next to the word Symbol click Edit
- Click the Graphics tab. Use the Choose button to bring your SVG graphic in.
Note (again) – If you’re working in Dark mode, you won’t be able to see your SVG in the display below after you add it (although, If you look really closely, you’ll see that it’s there). Alternatively, for the duration of this process, change the theme to “Light Mode” (Preferences>General>Window>[drop-down]) - Under the Preview, click Add graphic. Choose your newly downloaded custom SVG.
- Use the tools in the Component Editor screen to the left to adjust its position and scale, if needed.
- Exit the Component Editor.
- Click Start Cap. Select your “Crazy Vibrato” line (important!)
- Close the Line Editor
- Add it to the score, either by
- clicking a notehead and then clicking the new SVG line in the Lines palette,
- or by clicking the line first to attach it to the mouse cursor to drop into the score.
- You can adjust its position in Engrave Mode with the usual shortcuts, and change its size in Write mode with the Custom Scale property if needed.
Random Lines
What about a line that isn’t regular?
Not every graphical line describes periodic motion. Some notation calls for an irregular or organic gesture—a wavering glissando, unstable pitch, timbral fluctuation, or other continuously changing parameter. For those, a mathematically regular wave is exactly the wrong shape.
The Organic / Random Line Generator below starts with a series of points and introduces controlled horizontal and vertical randomness. The Wander control determines how strongly neighboring points influence one another, allowing shapes ranging from nearly independent randomness to long, fluid gestures.
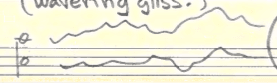
Organic / Random Line SVG Generator
Generate irregular smooth lines for wavering glissandi, unstable pitch, timbral motion and other graphic notation.