
Exporting General MIDI from Dorico
If you’ve ever exported a MIDI file from Dorico to load into external hardware, a DAW, or an interactive playback device, you may have encountered an interesting surprise: random low notes firing at the start of measures, strange pitch shifts, or unrequested patch changes.
If your active playback template relies on high-end sample libraries (like HALion Symphonic Orchestra or Kontakt), Dorico sends invisible keyswitch notes (often in octave -1 or 0) and VST-specific CC automation commands to trigger articulations. When exported to a standard General MIDI file, those VST keyswitch instructions are baked in as actual played musical notes.
While switching to a basic template like HALion Sonic Selection removes those keyswitches, it can also strip out continuous controller (CC) dynamics like CC1 (Modulation) or CC11 (Expression), or other playback information you may have created in the score, including pitch bends, expression data and more.
What if you want to export a score WITH all your dynamic hairpins, expression curves, pitch bends, and other automation, but WITHOUT any stray keyswitch notes?
Here is the ultimate, bulletproof method—along with a master reference chart and a free downloadable Expression Map you can use across all your projects.
The Core Concept: Decoupling Automation from Keyswitches
Dorico’s Expression Maps (Library > Expression Maps) bridge the gap between score notation and MIDI output. They tell Dorico two separate things:
- Dynamic & Automation Mapping: How to translate hairpins, volume markings (p, ff), pitch wheels, and vibrato into CC1, CC7, CC11, or Pitch Bend.
- Articulation Mapping: Which keyswitch notes (e.g., C0 for Staccato, C#0 for Pizzicato) to send when an articulation symbol appears.
To get a completely clean General MIDI file with full dynamic automation, all we need to do is strip out the articulation key switch actions while leaving Primary Dynamics, Secondary Dynamics, Pitch Bend, and Continuous Controller lanes intact.
                     Dorico Score Data
   (Notes, Hairpins, Dynamics, Pitch Bends, CC Lanes)
                            │
                            ▼
             "GM Clean & Automation" Map
    ├── Key Switch Actions: [DELETED] (No stray notes)
    ├── Primary Dynamic: CC11 (Expression) / CC1 (Modulation)
    ├── Secondary Dynamic: Velocity / CC7 (Volume)
    ├── Pitch Bend: Enabled (Semitone Range)
    ├── CC Automation Lanes (CC1–CC127): Passed Directly
    └── Program Change (PC) Actions: Retained / Passed
                            │
                            ▼
                    Exported .mid File
     ├── Pure Musical Pitch Data (Note On / Note Off)
     ├── Full Dynamic & Pitch CC Curves (CC1, CC11, Pitch Bend)
     ├── Embedded Program Change / Bank Select Patch Data
     └── ZERO Keyswitch Artifacts (C-1, C0, C#0)
Essential Prerequisite: Creating Custom Playback Techniques for MIDI CCs
When building a comprehensive General MIDI Expression Map, you will notice that Dorico’s factory library includes Playback Techniques for common notation markings (like Pizzicato, Legato, or Mute), but lacks native definitions for specialized MIDI CC controls like Vibrato Rate (CC76), Brightness/Cutoff (CC74), or Portamento Time (CC5).
Before you can assign these parameters inside an Expression Map switch, you must first define them in Dorico’s Playback Technique library.
Step-by-Step: Adding New Playback Techniques
To create custom Playback Techniques for your continuous controller parameters:
- Playback Technique (
Library > Playback Techniques) Create the abstract internal definition for your parameter (e.g., Vibrato Rate, Vibrato Depth, Brightness). - Expression Map Switch (
Library > Expression Maps) Link your Playback Technique to a specific MIDI Control Change (CC) action and value in your custom map, leaving all key switch fields empty. - Playing Technique (Optional) Create the visual text or symbol applied to the staff in Write Mode (via the Shift + P popover) that triggers the underlying Playback Technique.
Note: Creating the visual Playing Techniques (the score text or symbols applied in Write Mode) can be done later as needed. (Playing techniques connect score input to the Expression Map’s Playback Techniques.)
Creating the underlying Playback Techniques first is mandatory to enable the Expression Map to route score information to the player.
Linking Playback Techniques Inside the Expression Map
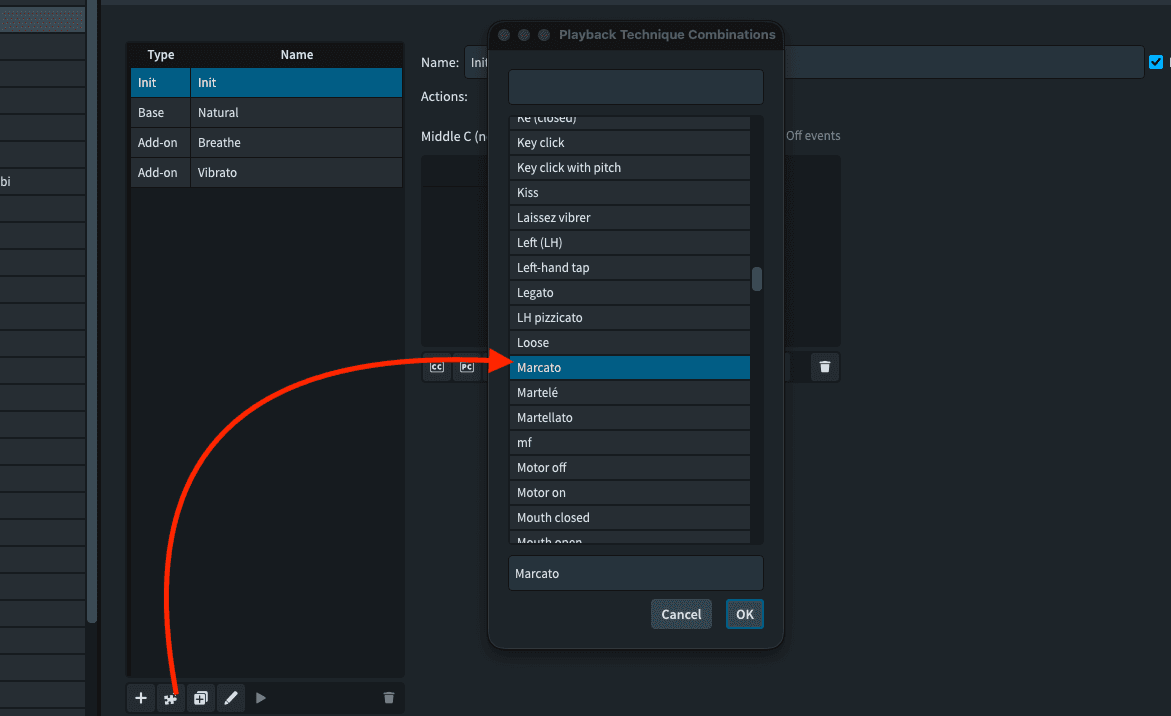
Once your custom Playback Techniques exist in the project library, you can link them directly to Control Change actions inside your Expression Map:
- Go to Library > Expression Maps.
- Select your GM Clean Export map.
- Under Base Switches, click + to add a new technique switch.
- In the technique selection dialog, choose your newly created Playback Technique (e.g., Vibrato Depth).
- Under Actions, click + > Control Change.
- Assign the corresponding MIDI CC number (e.g., CC 77) and define your target default value or range.
- Ensure no Key Switch actions are added to the switch.
By establishing these Playback Techniques first, you create a clean, organized internal matrix that maps score instructions and automation lanes directly to standard MIDI CCs without needing VST keyswitches.
Standard MIDI Continuous Controller (CC) Reference Chart
When exporting to external synthesizers or General MIDI hardware devices, use this reference guide to route score parameters or draw automation lanes in Dorico’s Key Editor:
| CC # | Control Name | Primary Function / Use Case |
|---|---|---|
| CC 1 | Modulation Wheel | Vibrato Depth / Dynamic Intensity |
| CC 2 | Breath Controller | Physical Wind/Brass Blow Pressure |
| CC 4 | Foot Controller | Pedal Expression / Foot Switch |
| CC 5 | Portamento Time | Glide/Slur Time Speed between notes |
| CC 6 | Data Entry MSB | Coarse Parameter Adjustment (RPN/NRPN) |
| CC 7 | Channel Volume | Main Track Level / Hardware Output Volume |
| CC 8 | Balance | Stereo Balance (Left/Right) |
| CC 10 | Pan | Stereo Panning Position |
| CC 11 | Expression | Dynamic Volume / Secondary Level Shading |
| CC 12 | Effect Control 1 | Fine Effect Parameter 1 |
| CC 13 | Effect Control 2 | Fine Effect Parameter 2 |
| CC 64 | Sustain Pedal | Damper Pedal (Hold) On/Off (≥64 is ON) |
| CC 65 | Portamento | Portamento Enable On/Off |
| CC 66 | Sostenuto | Hold specific held notes On/Off |
| CC 67 | Soft Pedal | Una Corda / Soft Playback Dampening |
| CC 68 | Legato Footswitch | Force Legato Transitions |
| CC 70 | Sound Variation | Waveform Shape / Timbre Variation |
| CC 71 | Harmonic Content | Resonance / Filter Q-Factor |
| CC 72 | Release Time | Envelope Release Speed |
| CC 73 | Attack Time | Envelope Attack Speed |
| CC 74 | Brightness | Low-Pass Filter Cutoff Frequency |
| CC 75 | Decay Time | Envelope Decay Rate |
| CC 76 | Vibrato Rate | Speed of Vibrato LFO |
| CC 77 | Vibrato Depth | Intensity / Amount of Vibrato |
| CC 78 | Vibrato Delay | Time Delay before Vibrato onset |
| CC 84 | Portamento Control | Base Pitch Origin for Portamento Slurs |
| CC 91 | Reverb Depth | Master Reverb Send Level |
| CC 92 | Tremolo Depth | Amplitude Tremolo Intensity |
| CC 93 | Chorus Depth | Master Chorus Send Level |
| CC 94 | Detune / Celeste | Microtonal Detune / Phase Depth |
| CC 95 | Phaser Depth | Master Phaser Send Level |
Step-by-Step: Setting Up the Universal “GM Clean” Expression Map
To build a universal General MIDI Expression Map that handles dynamic automation and continuous controllers without generating VST keyswitches:
Step 1: Create the Base Expression Map
- Go to Library > Expression Maps.
- Click the + button at the bottom left to create a new map.
- Name it GM Clean Export.
Step 2: Configure Dynamic & Pitch Controls
In the map properties panel on the right:
- Set Primary Dynamics to CC11 (Expression).
- Set Secondary Dynamics to Velocity.
- Enable Pitch Bend to allow pitch wheel automation to pass directly to the MIDI stream.
Step 3: Clear Key Switches
- Under Base Switches, select the Natural technique switch.
- Look at the Actions pane at the bottom right.
- Ensure no Key Switch actions are defined. (If duplicating an existing map, delete any Note On / Key Switch actions).
Step 4: Add CC Controls via Playback Techniques
To add continuous parameters (such as Vibrato Rate, Vibrato Depth, or Cutoff) to your Expression Map, they must be linked to a Playback Technique:
- In the Expression Map editor, click + under Base Switches (or Add Technique).
- Select a target Playback Technique from the list.
- If the technique is not listed:
- Close the Expression Map dialog and go to Library > Playback Techniques.
- Click + to add a new technique (or duplicate an existing one) and give it a clear name (e.g., Vibrato Rate, Brightness).
- Click OK to save it to your project library.
- Return to Library > Expression Maps and select your GM Clean Export map.
- Add the newly created Playback Technique to your switches.
- Under Actions, click + > Control Change and assign the corresponding MIDI CC number (e.g., CC 77 for Vibrato Depth, CC 76 for Vibrato Rate, or CC 74 for Brightness).
- Repeat this process for the key parameters you plan to use regularly.
How Score Data Reaches the MIDI Stream
Understanding how controller data moves from your score into the exported .mid file helps keep your workflow clean:
- Automatic CC Generation via Score Notation:When standard playing techniques or dynamic markings (p, f, hairpins) are added in Write Mode, Dorico automatically writes the underlying CC values directly into the corresponding Key Editor lanes (visible under Lower Panel > Key Editor in Write or Play Mode).
- Playback Technique Integration:When a score indication (a Playing Technique) is associated with its corresponding Playback Technique, Dorico activates the matching CC lane inside the Key Editor. Tweaking or drawing nodes manually is rarely necessary unless you want custom continuous shading.
- Applying the Clean Map Before Export:
- Switch to Play Mode (Ctrl/Cmd+4).
- Click the Endpoint Setup gear icon next to your VST or MIDI output rack.
- Change the Expression Map column for all tracks to GM Clean Export.
- Click Apply and Close.
- Go to File > Export > MIDI….
The Resulting MIDI Architecture
                    1. Score Notation / Dynamic Markings
                   (Hairpins, Text, Playing Techniques)
                                    │
                                    ▼
                     2. Playback Technique Link
                 (Library > Playback Techniques)
                                    │
                                    ▼
                     3. Expression Map Switch
                  (CC Assigned / No Keyswitches)
                                    │
                                    ▼
                       4. Exported .mid Stream
           ├── Musical Pitches (Note On / Note Off)
           ├── Continuous Controllers (CC11, CC76, CC77, etc.)
           ├── Pitch Bend & Program Change Data
           └── ZERO Keyswitch Artifacts
This workflow ensures your exported MIDI files contain rich, expressive controller data for external General MIDI playback hardware without cluttering the tracks with low-octave keyswitch notes.
Have questions about MIDI export, pitch bend sensitivity, or setting up custom playback templates in Dorico? Drop a comment below or join the conversation on our Facebook page!